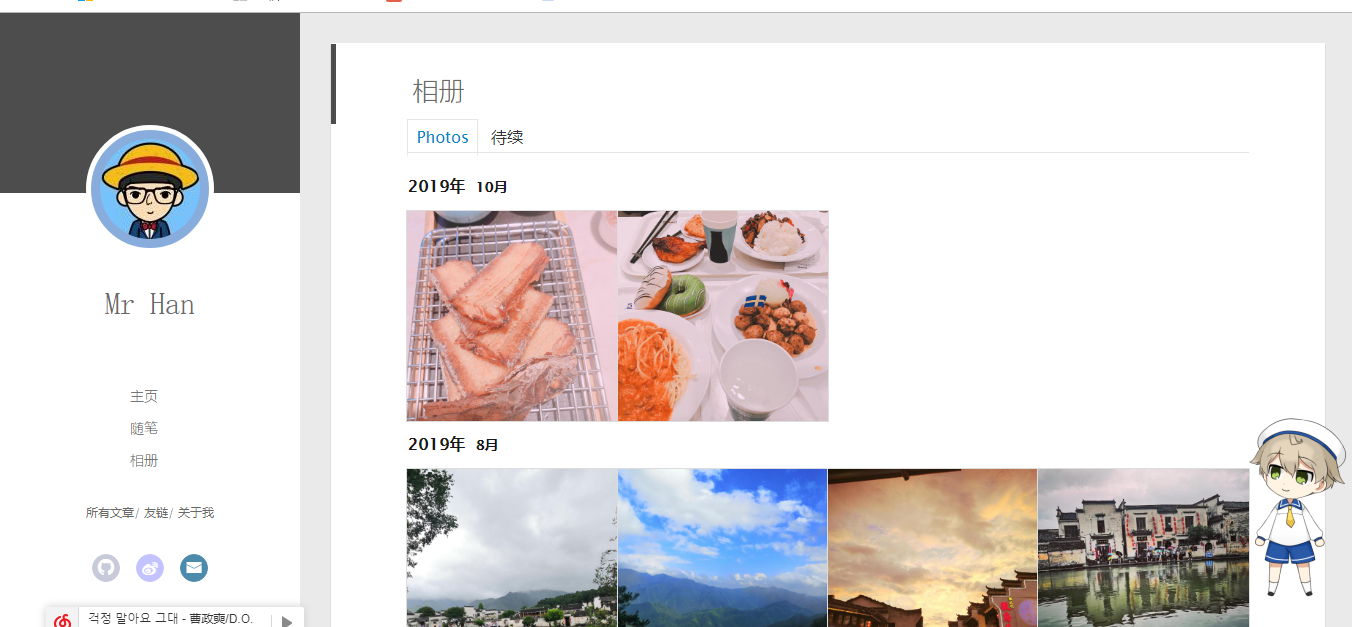
最终效果请看这里:https://hanlinbei.github.io/photos
说明
关于
- 我使用的主题是hexo-theme-yilia,其中实现相册功能的方案是同步instagram上面的图片,但是现在instagram被禁,不能使用了
下面是通过自己的方式实现了相册功能,其中的样式还是使用该主题提供的。
方案
在github上新建一个仓库,主要用于存储图片,可以通过url访问到,也方便管理
- 将要放到相册的图片处理成json格式的数据,然后进行访问,这里json的格式需要配合要使用的样式,所以需要处理成特定格式的json数据,下面会给出
- 图片裁剪,因为相册显示的样式最好是正方形的的图片,这里使用脚本处理一下
- 图片压缩,相册显示的图片是压缩后的图片,提高加载的速度,打开后的图片是原图。
实现
github操作
- 建立一个用于存储相册的仓库,我这里建立了名为BlogPicturep的仓库

- 关于git的命令行操作和配置不再给出
博客操作
- 在博客的source文件夹下建立一个photos文件夹
- 如果是通过hexo new 的方式创建的记得把index.md文件删掉,我试过不删掉就渲染不出来。
- 将样式文件放到photos文件夹下,样式文件我都放到了github上:https://github.com/hanlinbei/hanlinbei.github.io/tree/master/photos 在github上一般很难下载单个文件夹,在这里我可以推荐一个gitzip的谷歌浏览器插件,可以右键很方便的把文件打包成一个压缩包下载,不必下载整个项目。整个项目很难下载得下来。
- 修改ins.js文件,主要是里面的render函数
其中的url对应到你的github放图片的地址
1
2
3
4
5
6
7
8
9
10
11
12
13
14
15
16
17
18
19
20
21
22
var render = function render(res) {
var ulTmpl = "";
for (var j = 0, len2 = res.list.length; j < len2; j++) {
var data = res.list[j].arr;
var liTmpl = "";
for (var i = 0, len = data.link.length; i < len; i++) {
var minSrc = 'https://raw.githubusercontent.com/lawlite19/blog-back-up/master/min_photos/' + data.link[i];
var src = 'https://raw.githubusercontent.com/lawlite19/blog-back-up/master/photos/' + data.link[i];
var type = data.type[i];
var target = src + (type === 'video' ? '.mp4' : '.jpg');
src += '';
liTmpl += '<figure class="thumb" itemprop="associatedMedia" itemscope="" itemtype="http://schema.org/ImageObject">\
<a href="' + src + '" itemprop="contentUrl" data-size="1080x1080" data-type="' + type + '" data-target="' + src + '">\
<img class="reward-img" data-type="' + type + '" data-src="' + minSrc + '" src="/assets/img/empty.png" itemprop="thumbnail" onload="lzld(this)">\
</a>\
<figcaption style="display:none" itemprop="caption description">' + data.text[i] + '</figcaption>\
</figure>';
}
ulTmpl = ulTmpl + '<section class="archives album"><h1 class="year">' + data.year + '年<em>' + data.month + '月</em></h1>\
<ul class="img-box-ul">' + liTmpl + '</ul>\
</section>';
}
地址一定是点击这个download后浏览器框上出现得地址

图片处理
- python脚本文件都放在了这里:https://github.com/hanlinbei/BlogPicture
(1). 裁剪图片 - 去图片的中间部分,裁剪为正方形
对应的裁剪函数
1
2
3
4
5
6
7
8
9
10
11
12
13
14
15
16
17
18
19
20
def cut_by_ratio(self):
"""按照图片长宽进行分割
------------
取中间的部分,裁剪成正方形
"""
im = Image.open(self.infile)
(x, y) = im.size
if x > y:
region = (int(x/2-y/2), 0, int(x/2+y/2), y)
#裁切图片
crop_img = im.crop(region)
#保存裁切后的图片
crop_img.save(self.outfile)
elif x < y:
region = (0, int(y/2-x/2), x, int(y/2+x/2))
#裁切图片
crop_img = im.crop(region)
#保存裁切后的图片
crop_img.save(self.outfile)(2) 压缩图片
把图片进行压缩,方便相册的加载1
2
3
4
5
6
7
8
9
10
11
12
13
14
15
16
17
18
19
20
21
22def compress(choose, des_dir, src_dir, file_list):
"""压缩算法,img.thumbnail对图片进行压缩,
参数
-----------
choose: str
选择压缩的比例,有4个选项,越大压缩后的图片越小
"""
if choose == '1':
scale = SIZE_normal
if choose == '2':
scale = SIZE_small
if choose == '3':
scale = SIZE_more_small
if choose == '4':
scale = SIZE_more_small_small
for infile in file_list:
img = Image.open(src_dir+infile)
# size_of_file = os.path.getsize(infile)
w, h = img.size
img.thumbnail((int(w/scale), int(h/scale)))
img.save(des_dir + infile)github提交
处理完成之后需要将处理后的图片提交到github上
这里同样使用脚本的方式,需要将git命令行配置到环境变量中
1
2
3
4
5
6
7
8
9
10
def git_operation():
'''
git 命令行函数,将仓库提交
----------
需要安装git命令行工具,并且添加到环境变量中
'''
os.system('git add --all')
os.system('git commit -m "add photos"')
os.system('git push origin master')
json数据处理
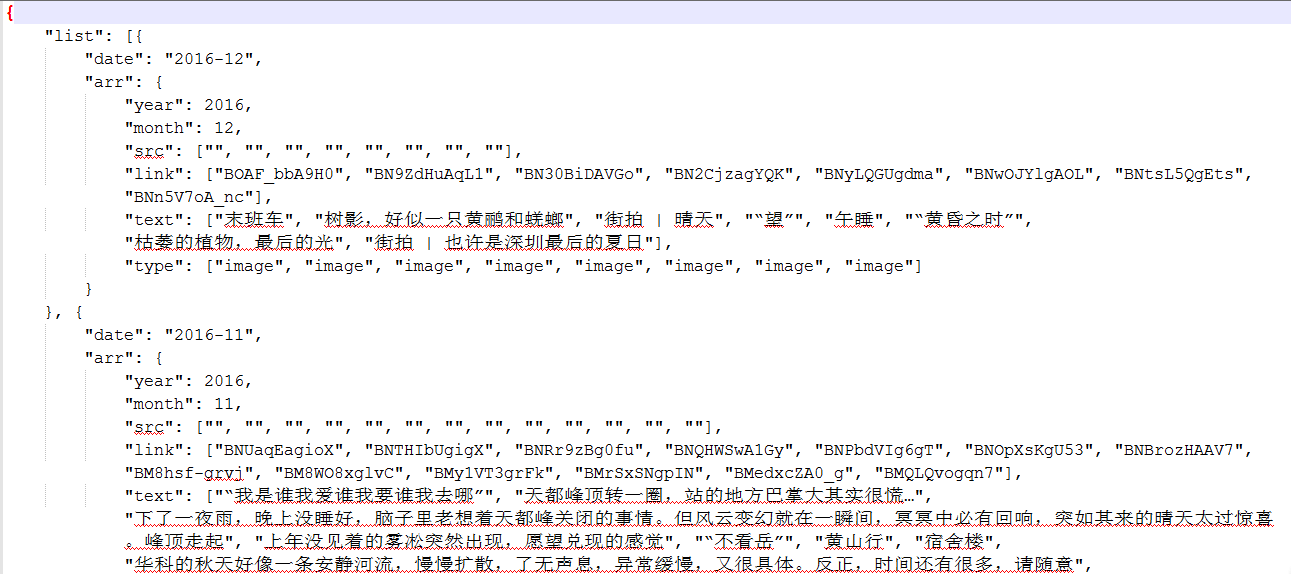
- 下面就需要将图片信息处理成json数据格式了,这里为重点
最终需要的json格式的数据如下图:

这里我采用的方式是读取图片的名字作为其中的text的内容,图片的命名如下图

最前面是日期,然后用_进行分隔
后面是图片的描述信息,注意不要包含_和.符号 这个命名一定要规范,不能有问题。
实现代码:
注意代码中../blog/source/photos/data.json是对应到我的博客的路径,这里根据需要改成自己博客的路径1
2
3
4
5
6
7
8
9
10
11
12
13
14
15
16
17
18
19
20
21
22
23
24
25
26
27
28
29
30
31
32
33
34
35
36
37
38
39
40
41ef handle_photo():
'''根据图片的文件名处理成需要的json格式的数据
-----------
最后将data.json文件存到博客的source/photos文件夹下
'''
src_dir, des_dir = "photos/", "min_photos/"
file_list = list_img_file(src_dir)
list_info = []
for i in range(len(file_list)):
filename = file_list[i]
date_str, info = filename.split("_")
info, _ = info.split(".")
date = datetime.strptime(date_str, "%Y-%m-%d")
year_month = date_str[0:7]
if i == 0: # 处理第一个文件
new_dict = {"date": year_month, "arr":{'year': date.year,
'month': date.month,
'link': [filename],
'text': [info],
'type': ['image']
}
}
list_info.append(new_dict)
elif year_month != list_info[-1]['date']: # 不是最后的一个日期,就新建一个dict
new_dict = {"date": year_month, "arr":{'year': date.year,
'month': date.month,
'link': [filename],
'text': [info],
'type': ['image']
}
}
list_info.append(new_dict)
else: # 同一个日期
list_info[-1]['arr']['link'].append(filename)
list_info[-1]['arr']['text'].append(info)
list_info[-1]['arr']['type'].append('image')
list_info.reverse() # 翻转
final_dict = {"list": list_info}
with open("../lawlite19.github.io/source/photos/data.json","w") as fp:
json.dump(final_dict, fp)
每次图片有改动都需要执行此脚本文件
效果展示
可能会遇到得问题
缩略图不显示
首先,去下载“empty.png” 点这里
直接右键另存,保存为“empty.png”。名字也要一样,别问为什么,实现了,自己再去看源码。
在你博客的本地仓库source下新建一个文件夹命名为assets,再在assets下新建一个文件夹命名为img。最后把empty.png放到img里面。我的结果如下:
这样做好像就完事了,可以成功看到缩略图显示出来。其实操作本不复杂严格按照教程来,细心点
网页没有渲染出来
如果是github操作一定要及时查看邮件,如果渲染不出来有错误你会收到github发送过来的邮件
如果没有错误记得请一下浏览器的缓存,可能会是浏览器缓存造成的 刷新还是原来的页面。
本文链接: https://linbei.top/Hexo%E6%B7%BB%E5%8A%A0%E7%9B%B8%E5%86%8C/
版权声明: 本作品采用 知识共享署名-非商业性使用-相同方式共享 4.0 国际许可协议 进行许可。转载请注明出处!


